GENERAL
How to Sell Stickers on Amazon: A Beginner’s Guide


Stickers are cheap to produce, easy to ship, and buyers on Amazon search for them every day—from laptop decals to water bottle designs to niche hobby art. The margins can be surprisingly good if you pick the right angle.
This guide shows you how to sell stickers on Amazon from the ground up: choosing a profitable niche, deciding between print-on-demand and bulk production, setting up your listing, and picking between FBA and FBM.
Table of Contents
Why Is Selling Stickers on Amazon a Good Idea?
Stickers are one of the easiest products to get into if you’re new to selling online. They’re cheap to make, light to ship, and people buy them for all kinds of reasons, laptops, water bottles, notebooks. That mix of low cost and wide appeal is hard to beat.
Amazon adds a few things on top that matter. The traffic is already there, so a new seller doesn’t have to spend months building an audience the way they would on a personal website or Etsy shop.
Shoppers also trust the checkout process, which lowers the hesitation people usually have when buying from a brand they’ve never heard of. The math tends to work in the seller’s favor too.
A sheet of stickers might cost under a dollar to print and can sell for several times that. Storage is simple because the inventory takes up almost no space, and shipping costs stay low whether the seller handles orders at home or uses Amazon’s fulfillment service.
Testing ideas is cheap too. A batch of 25 stickers runs about $10, and a month on Amazon shows whether it sells. Winners get reordered, the rest get pulled. Most sellers find their niche by trying a dozen designs and letting buyers pick.
How to Sell Stickers on Amazon: 7-Step Guide
Step 1: Set Up Your Amazon Seller Account
Head to sellercentral.amazon.com and pick a plan. The Individual plan charges 99 cents per sale and works fine if you’re testing the waters. The Professional plan runs $39.99 a month and pays off once you’re selling more than 40 stickers monthly.
Have a bank account, tax info, and government ID ready before you start — Amazon verifies all three during signup, and getting stuck halfway means starting over. The whole process takes about 20 minutes if your documents are ready.
Step 2: Research What People Actually Buy
Skip the guesswork. Type “stickers” into Amazon’s search bar and see what auto-completes — those are real searches from real shoppers. Then use free tools like Helium 10’s Chrome extension to check monthly sales on the top listings.
Look for niches with steady demand but fewer than 50 competing sellers — enough buyers, but no giants to fight. Nurse stickers, houseplant stickers are pockets that keep moving. Broader terms like “cute stickers” look tempting, but new listings get buried on page 10.
Step 3: Decide How You’ll Make Them
You’ve got two paths here:
- Do it yourself: Buy a vinyl cutter (a Cricut runs about $250) and print at home. Higher margins, more work.
- Use a print service: Companies like PrintKK handle printing and shipping for each order.
Most beginners start with print on demand stickers to test designs risk-free, then switch to DIY once a design proves it sells.
Step 4: Design Your Stickers
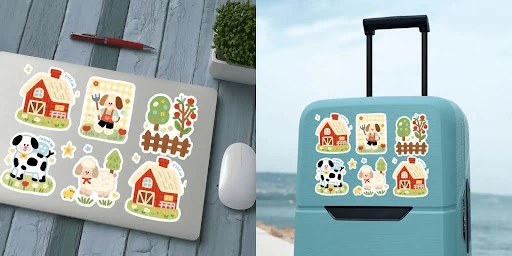
Canva handles most of what a beginner needs for free. Adobe Illustrator is worth learning once you’re reordering designs. Whatever tool you pick, keep designs simple. Stickers print between 2 and 4 inches, so thin lines and small text turn to mush at that size.
Save as PNG at 300 DPI with a transparent background. And skip anything you don’t own the rights to. Amazon’s bots flag these within days, and a single IP complaint can freeze your whole account, not just the listing.
Step 5: Create Your Listing
Your title should name the sticker type, style, and where people would stick it — something like “Funny Cat Sticker for Laptop, Water Bottle, and Notebook.” Shoot photos on a white background plus one lifestyle shot showing the sticker actually stuck to something.
Price within a dollar of the top three sellers — too high and shoppers skip you, too low and they doubt the quality. Fill backend keywords with terms you couldn’t fit in the title, like misspellings and related phrases.
Step 6: Pick Your Fulfillment Method
Amazon gives you two options. With FBA, you ship stickers to their warehouse and they pack, ship, and handle returns for you. With FBM, every order lands in your inbox and you drop it in the mail yourself.
The math splits at volume. Under 20 orders a day, FBM usually beats FBA Past that, the time you’d spend printing labels and driving to the post office outweighs the fee difference, and FBA’s Prime badge starts pulling in buyers who filter for two-day shipping.
Step 7: Launch and Get Your First Reviews
The first two weeks matter most. Run Amazon PPC ads at $5 to $10 a day to get eyes on your listing — without traffic, the algorithm won’t push it. Use the “Request a Review” button in Seller Central after each order ships.

Ten honest reviews usually tips a listing into steady sales — but that might mean two or three orders a day, not twenty. Most sellers stack five or six listings before the income feels worth it.
Conclusion
Figuring out how to sell stickers on Amazon isn’t complicated — it’s just a series of small steps done in the right order. Set up your account, find a niche where real buyers hang out, design something simple, and get your first listing live.
The sellers who make it work aren’t the most creative ones. They’re the ones who launch, learn from the numbers, and keep adding designs. Your first sticker won’t be your best, and that’s fine. Get it out there and start.


What a Transparent Chiropractic Fee Structure Covers

What Is a Medical Pedicure? Why Podiatrist Foot Care Matters Most

Bebasinindo: Championing Freedom in Indonesia

Ankwave: Future of Connectivity with Energy-Efficient Solutions

Afruimwagens: Efficient Mobile Carts for Workspaces

Understanding Formula 1 Standings and Championship Rankings

Do Cats Fart? A Scientific and Behavioral Look at Feline Gas

Hatha Yoga: Balancing Body, Mind, and Energy

Wave_of_Happy_: Cultivating a Positive Mindset for Lasting Joy

Gamer Challenger: Definition, Role, and Competitive Focus

Slope Unblocked: Free Online 3D Ball Running Game

Brand Name Normalization Rules: A Complete Practical Guide

Veneajelu: The Finnish Art of Peaceful Summer Boating

The Journey of iamnobody89757: From Anonymous User to Internet Sensation

Adsy.pw/hb3: The Future of High-Impact Digital Advertising
-
 GENERAL1 year ago
Christofle – For Those Who Dream of Family Heirloom Silver
-
GENERAL9 months ago
Uncovering the World of кинокрадко: The Dark Side of Film Piracy
-
SPORTS2 months ago
Discover the World of Football with Streameast: Watch Your Favorite Leagues and Tournaments
-
HOME IMPROVEMENT2 years ago
Spacious and Stylish 300cm Round Rugs: Elegant and Modern Designs for a Chic Home Decor