YOGA
Crow Pose Yoga Guide: How to Practice Kakasana Safely

Crow pose yoga, traditionally known as Kakasana, is one of the most recognizable arm balances in modern yoga practice. While it is often perceived as an advanced posture, the crow pose is better understood as a skill-based asana, one that develops gradually through strength, coordination, and intelligent alignment rather than raw power alone.
Crow pose yoga is an arm balance where the body’s center of gravity shifts forward, allowing the feet to lift as the knees rest on the upper arms. The pose demands an integrated effort from the wrists, shoulders, core, and hips, making it a full-body posture despite its compact shape.
In classical yoga texts, Kakasana symbolizes alertness, adaptability, and balance qualities that become evident as practitioners work through the challenges of the pose.
Table of Contents
Crow Pose vs. Crane Pose (Kakasana vs. Bakasana)
One of the most common points of confusion is the difference between the crow pose and the crane pose:
- Crow Pose (Kakasana): Arms are bent, knees rest higher on the arms.
- Crane Pose (Bakasana): Arms are straight, knees rest closer to the armpits.
In contemporary yoga classes, these names are often used interchangeably. However, the crow pose is generally more accessible and serves as a foundational step toward the crane pose.
Biomechanics: How Crow Pose Actually Works
Crow pose yoga is less about lifting and more about weight management.
Key Mechanical Principles
- Forward Weight Shift: The body must move forward enough that the feet become light. Hesitation here is often what keeps practitioners grounded.
- Active Hands: Pressing firmly through the fingertips reduces wrist strain and stabilizes balance.
- Core Compression: Drawing the abdomen inward creates lift and prevents collapsing into the shoulders.
- Scapular Engagement: Protraction of the shoulder blades supports the upper body and protects the shoulder joints.
Understanding these mechanics helps demystify the pose and makes progress more predictable.
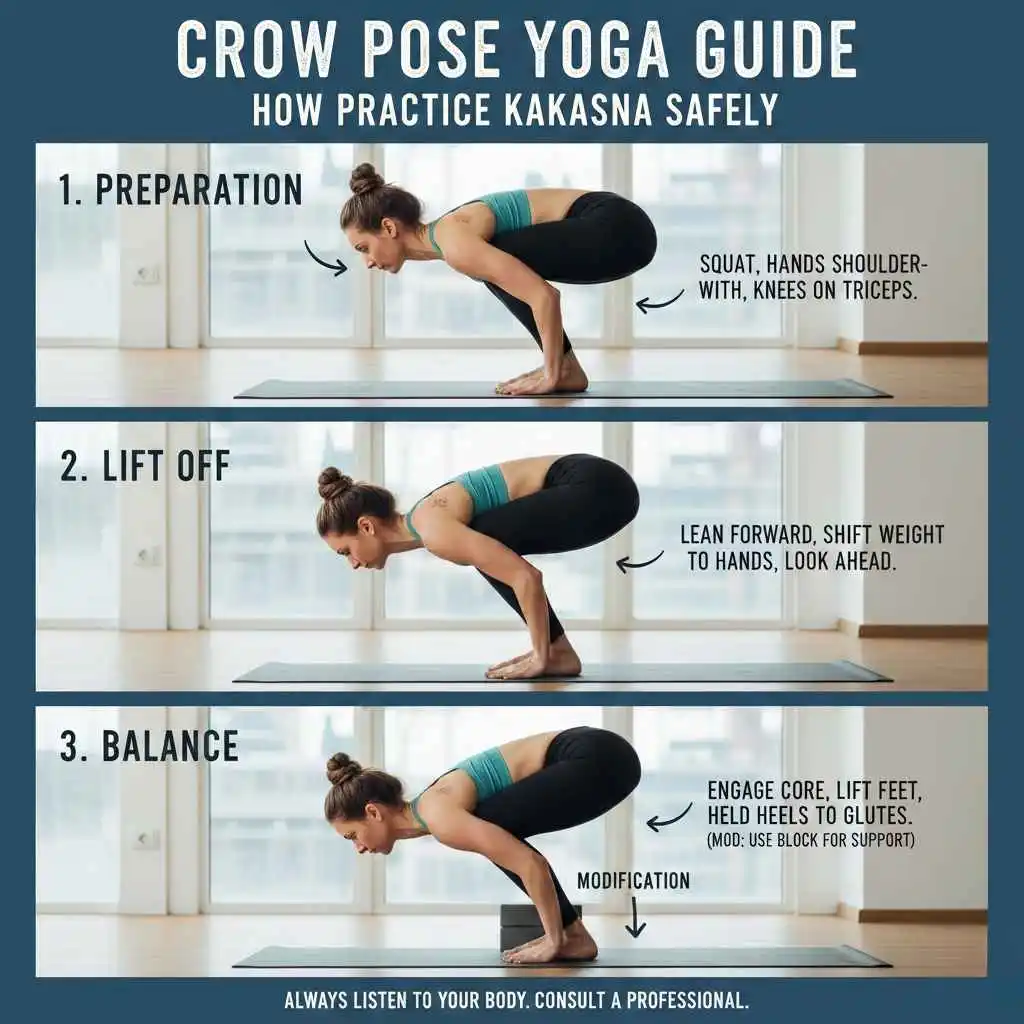
Step-by-Step Approach
Rather than forcing the posture, the crow pose is best approached methodically:
- Begin in a Squat (Malasana): This position prepares the hips and establishes a low center of gravity.
- Place the Hands Firmly: Hands should be shoulder-width apart, fingers spread wide.
- Create an Arm Shelf: Bend the elbows slightly and position the knees on the upper arms.
- Lean Forward Gradually: Shift your gaze slightly ahead of your hands to encourage forward movement.
- Lift One Foot at a Time: This builds confidence and allows controlled balance.
- Maintain Steady Breathing: Smooth breathing prevents unnecessary tension.
Progress is often subtle; lifting for even a second is meaningful progress.
Common Challenges and Practical Solutions
Fear of Falling Forward
This is the most common mental barrier. Using a folded blanket or bolster in front of the mat can reduce fear and encourage commitment to the forward shift.
Wrist Discomfort
Wrist pain usually comes from passive hands. Actively pressing through the fingers and warming up the wrists beforehand can significantly reduce strain.
Difficulty Lifting the Feet
This is often a core engagement issue rather than an arm strength problem. Practicing poses like plank, boat pose, and knee-to-chest drills can help.
Benefits of Kakasana
Physical Benefits
- Strengthens wrists, forearms, shoulders, and core
- Improves hip mobility and spinal awareness
- Enhances overall coordination and balance
Neuromuscular and Mental Benefits
- Develops proprioception (body awareness)
- Encourages calm focus under physical challenge
- Builds confidence through controlled risk-taking
Many practitioners report that mastering it shifts their mindset toward other challenging postures.
How Long Does It Take to Learn Crow Pose?
There is no fixed timeline, but realistic expectations help:
- 2–4 weeks: Improved wrist strength and balance awareness
- 1–3 months: Consistent foot lift and short holds
- 3–6 months: Stable holds and smooth transitions
Progress depends on practice frequency, preparation, and individual anatomy, not effort alone.
Variations and Progressions
Once the crow pose yoga feels stable, practitioners can explore variations:
- One-Legged Crow: Enhances unilateral balance and core control
- Side Crow (Parsva Bakasana): Introduces spinal rotation and oblique strength
- Crow to Chaturanga Transitions: Develops flow, control, and upper-body endurance
These variations should be introduced gradually to avoid overuse injuries.
Safety and Contraindications
Crow pose yoga should be practiced with caution by individuals with:
- Wrist or shoulder injuries
- Recent surgery
- Chronic joint instability
Beginners benefit greatly from guidance by a qualified instructor to ensure safe alignment and progression.
Conclusion
Crow pose yoga is not merely an arm balance; it is a lesson in patience, awareness, and intelligent effort. Rather than forcing strength, the pose rewards those who understand balance, alignment, and timing. With consistent practice and mindful preparation, the crow pose becomes less about “holding a pose” and more about learning how the body moves as an integrated whole.

Mastering the Standing Split: A Step-by-Step Guide

7 Entry Level Yoga Poses for Stress Relief

10 Backbend Yoga Poses for Beginners

10 Best Yin Yoga Poses for Deep Relaxation

Yoga and Stress: Can Relaxation Improve Facial Appearance?

Manual Therapy vs Exercise Therapy: Which Approach Works Best for Breast Cancer Physical Therapy?

Is Therapy the Missing Piece in Your Journey to a Healthier, Happier Life?

Thera Rehab Strategies: Essential Guide for Effective Breast Cancer Recovery

Audio Converter AI Audio to Text Converter Full Review: Best Free AI-Powered Audio Transcription Tool in 2026

The Workout Habits Quietly Holding Women Back at the Pilates

The 5 Best HIPAA-Compliant Communication Platforms for Multi-Location Healthcare Organizations

Cataracts and Diabetes: What Patients in Singapore Should Know

Cosmetic Dentistry Trends in 2026: How Minimally Invasive Techniques Are Creating Natural, Youthful Smiles

Teeth Grinding Causes, Symptoms, and Treatment Options

Meditation and Hair Loss: Causes, Benefits, and Limits
-
 GENERAL12 months ago
Christofle – For Those Who Dream of Family Heirloom Silver
-
SPORTS1 year ago
Discover the World of Football with Streameast: Watch Your Favorite Leagues and Tournaments
-
GENERAL6 months ago
Uncovering the World of кинокрадко: The Dark Side of Film Piracy
-
GENERAL2 months ago
Unveiling the Art of преводсч: How Translators Bridge Language Barriers